Monitoring and Modifying PID Controllers in the Sandbox
Once you create a PID Controller using the Python API, you can monitor real-time data and edit specific parameters in the Sandbox.
Toggle the PID Controllers menu by pressing the PID Menu Toggle in the left side menu:
| PID Controller Menu Toggle |

|
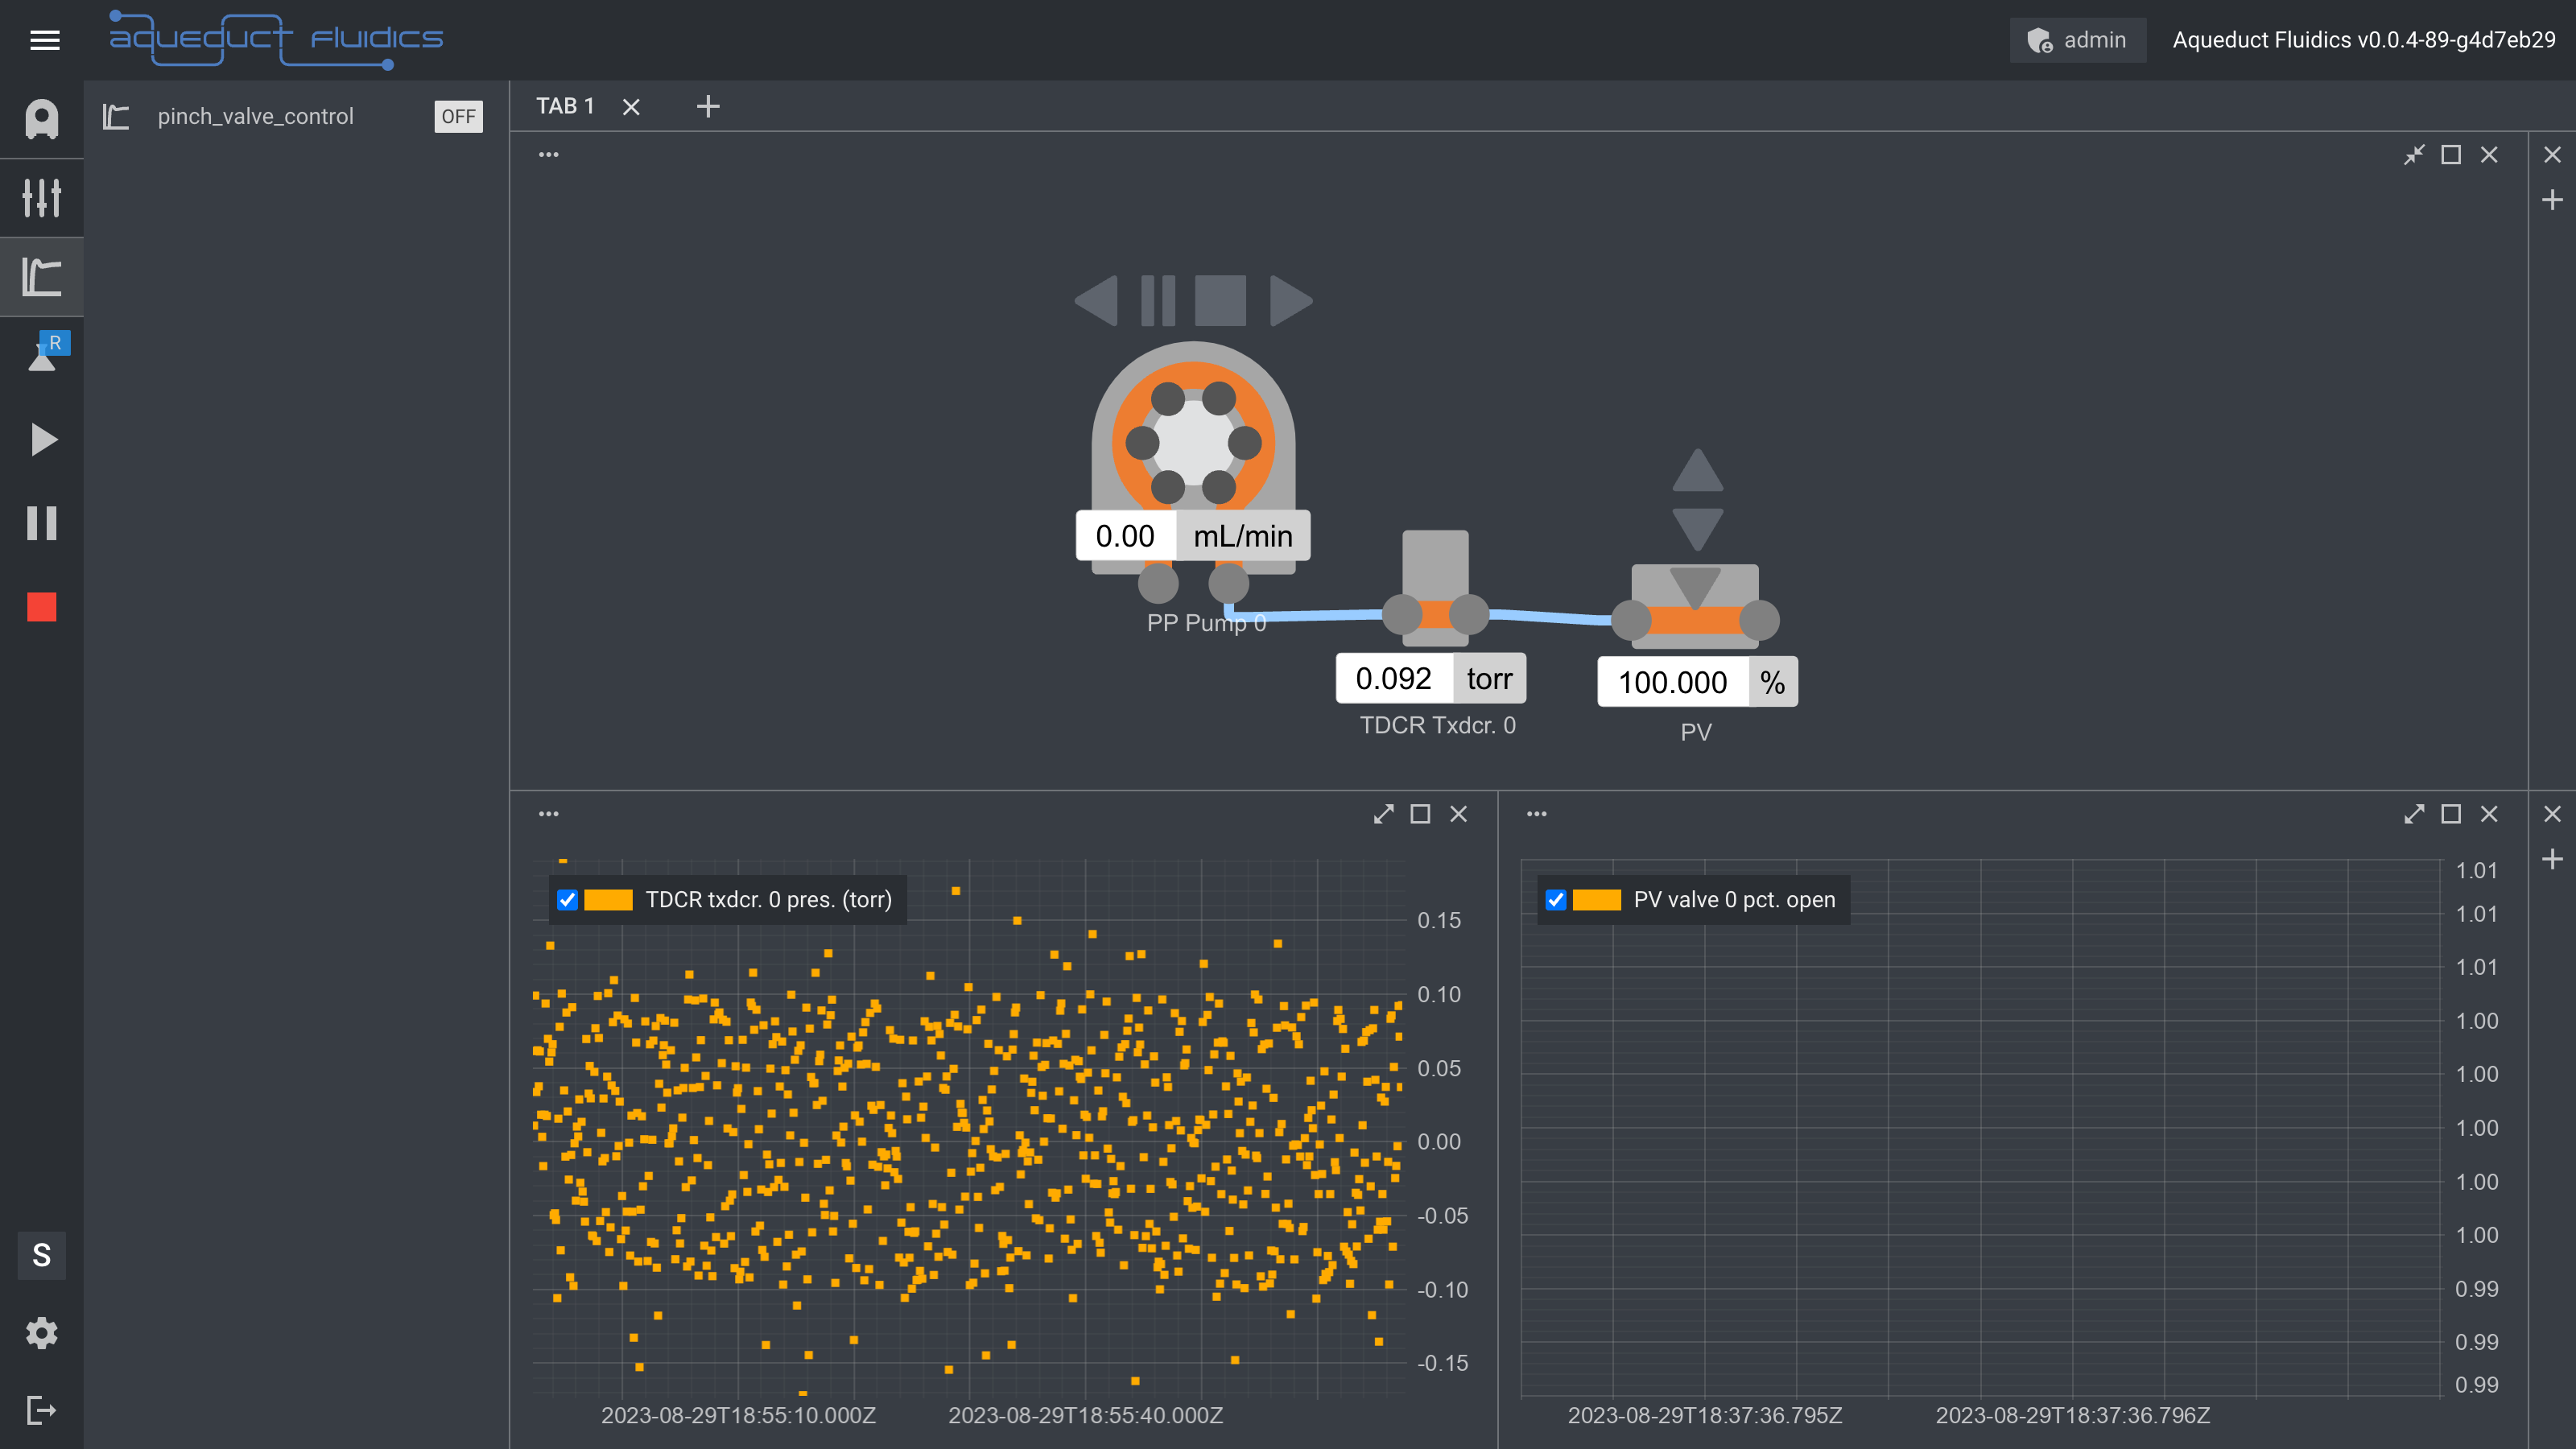
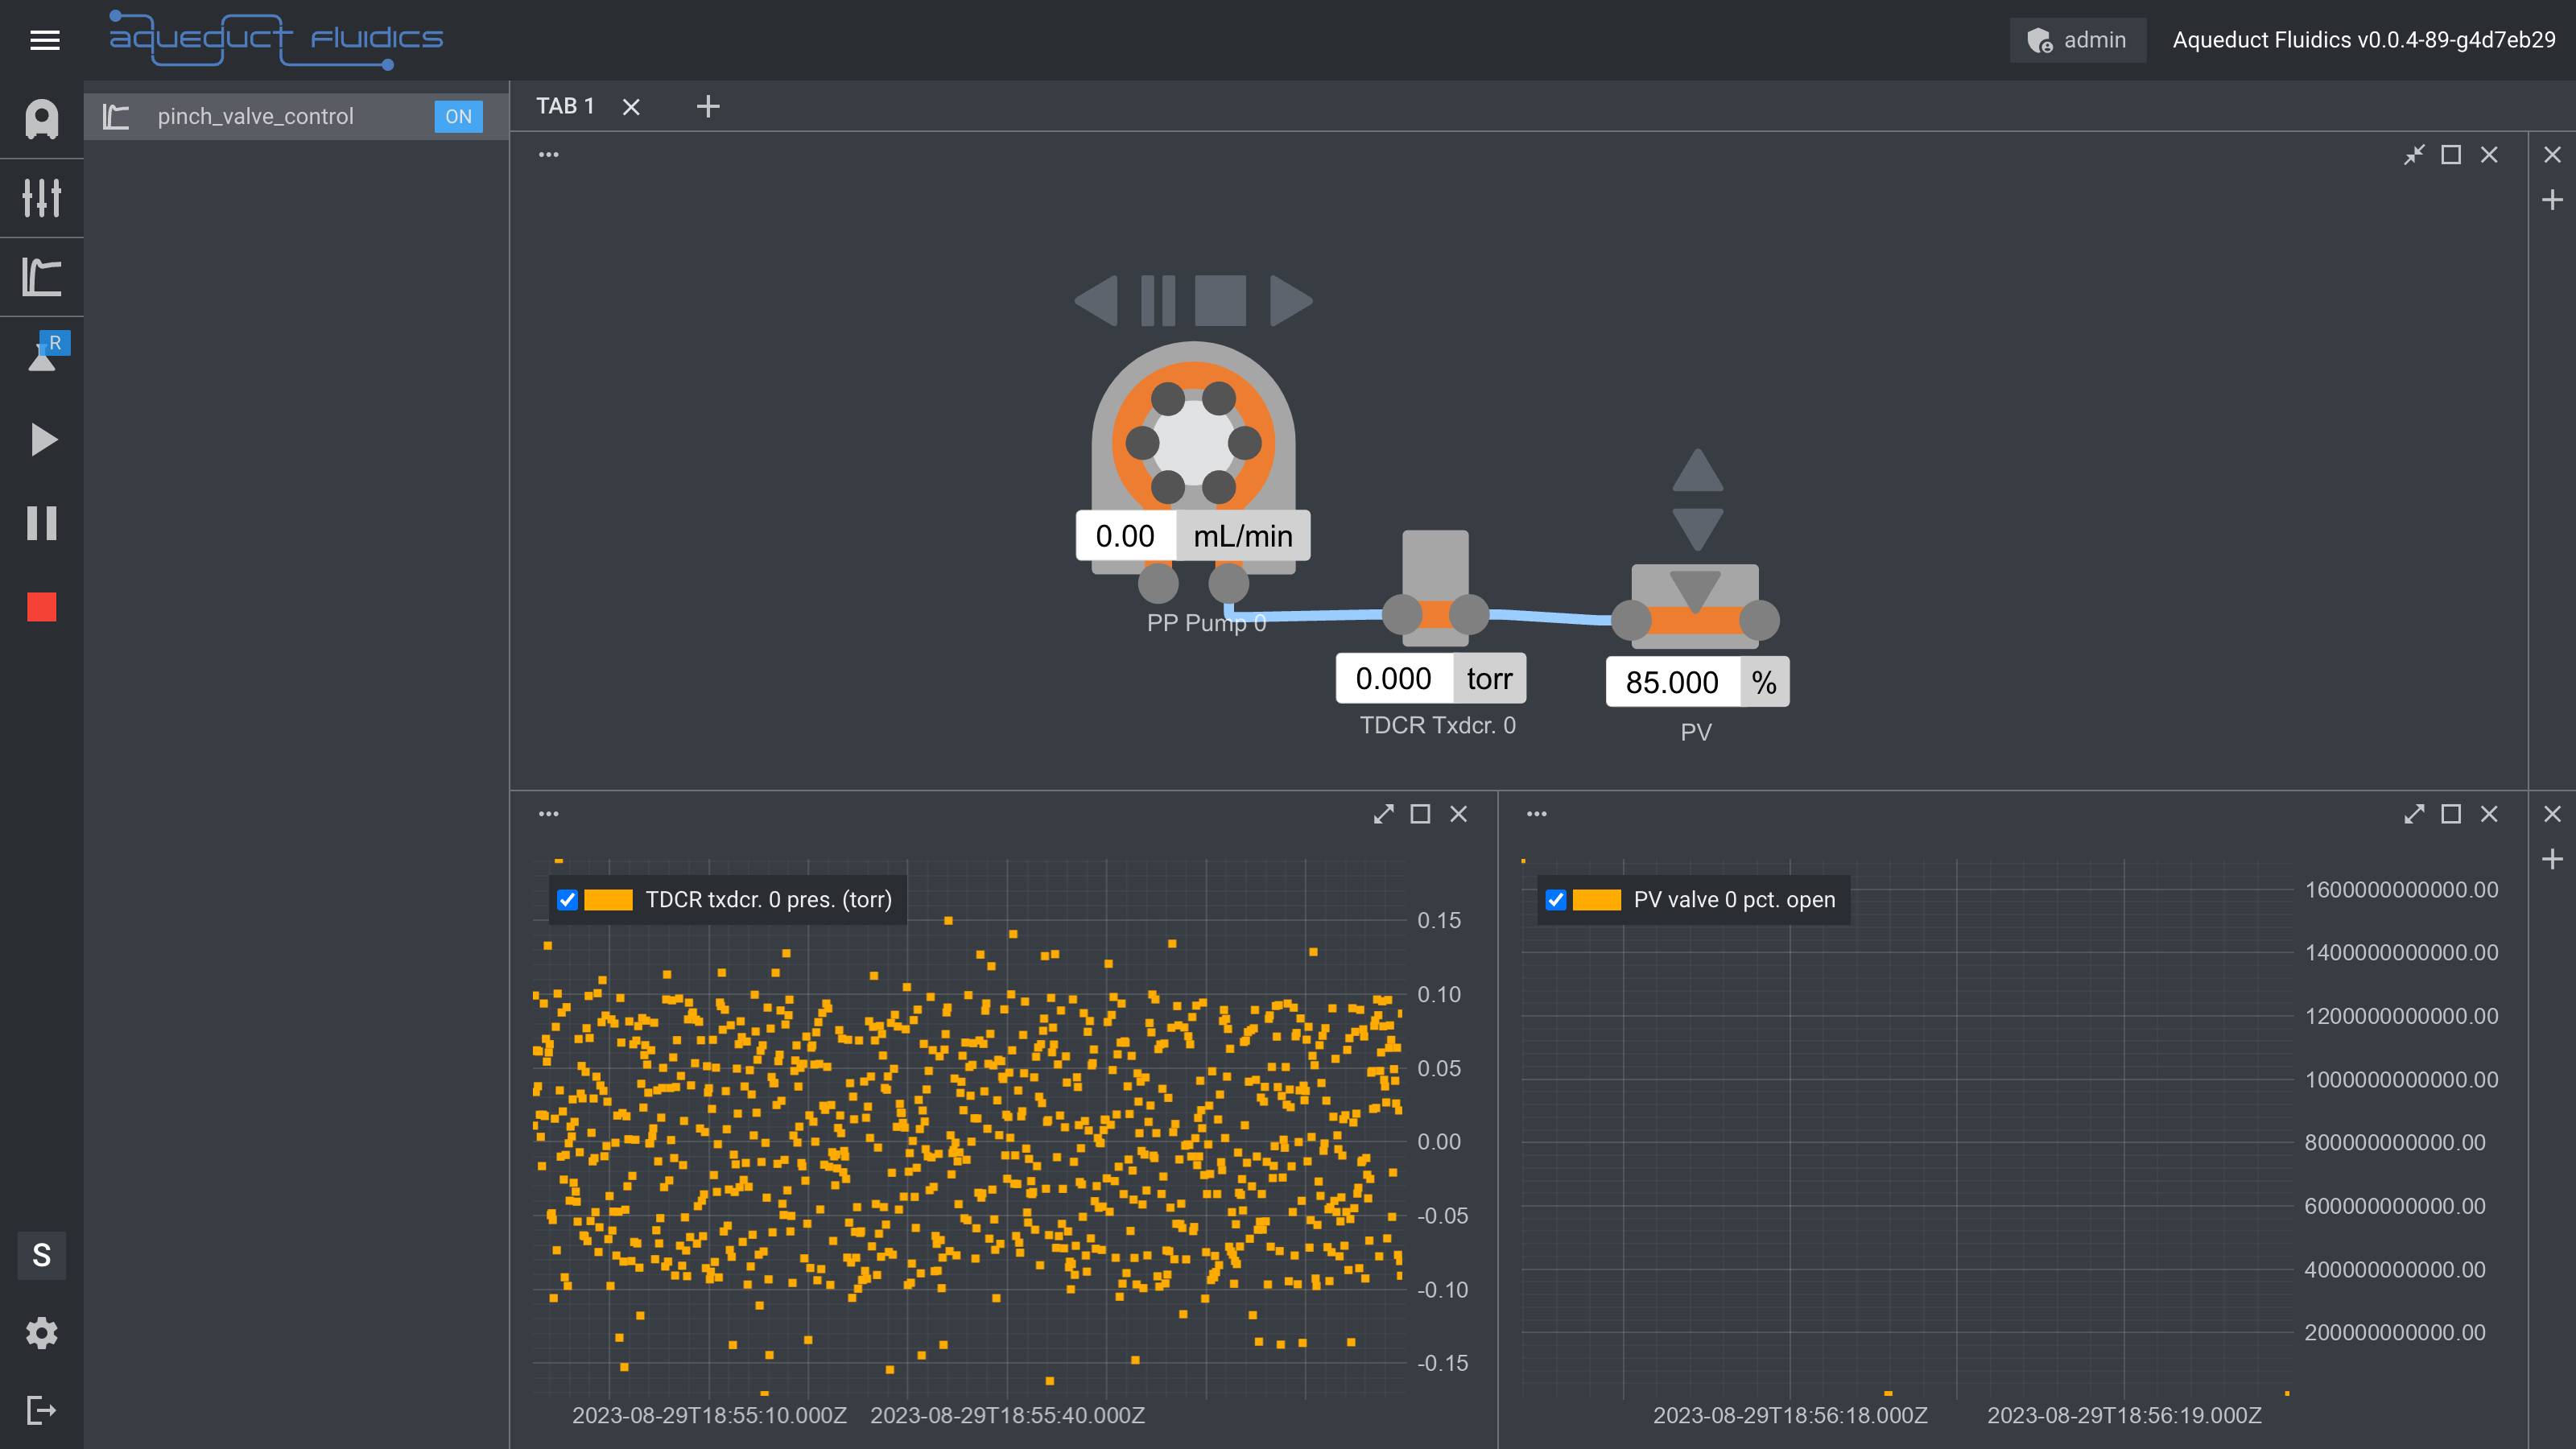
The menu displays a list of PID Controllers by name, each with an adjacent 'ON/OFF' toggle button.
Use the button to activate or deactivate the controller.
Detailed View
Click on a PID Controller to reveal a table containing detailed information about the current output and schdule list. You can drag the table around the screen using the top of the pop up window and resize the window using the grab handle in the lower right corner.
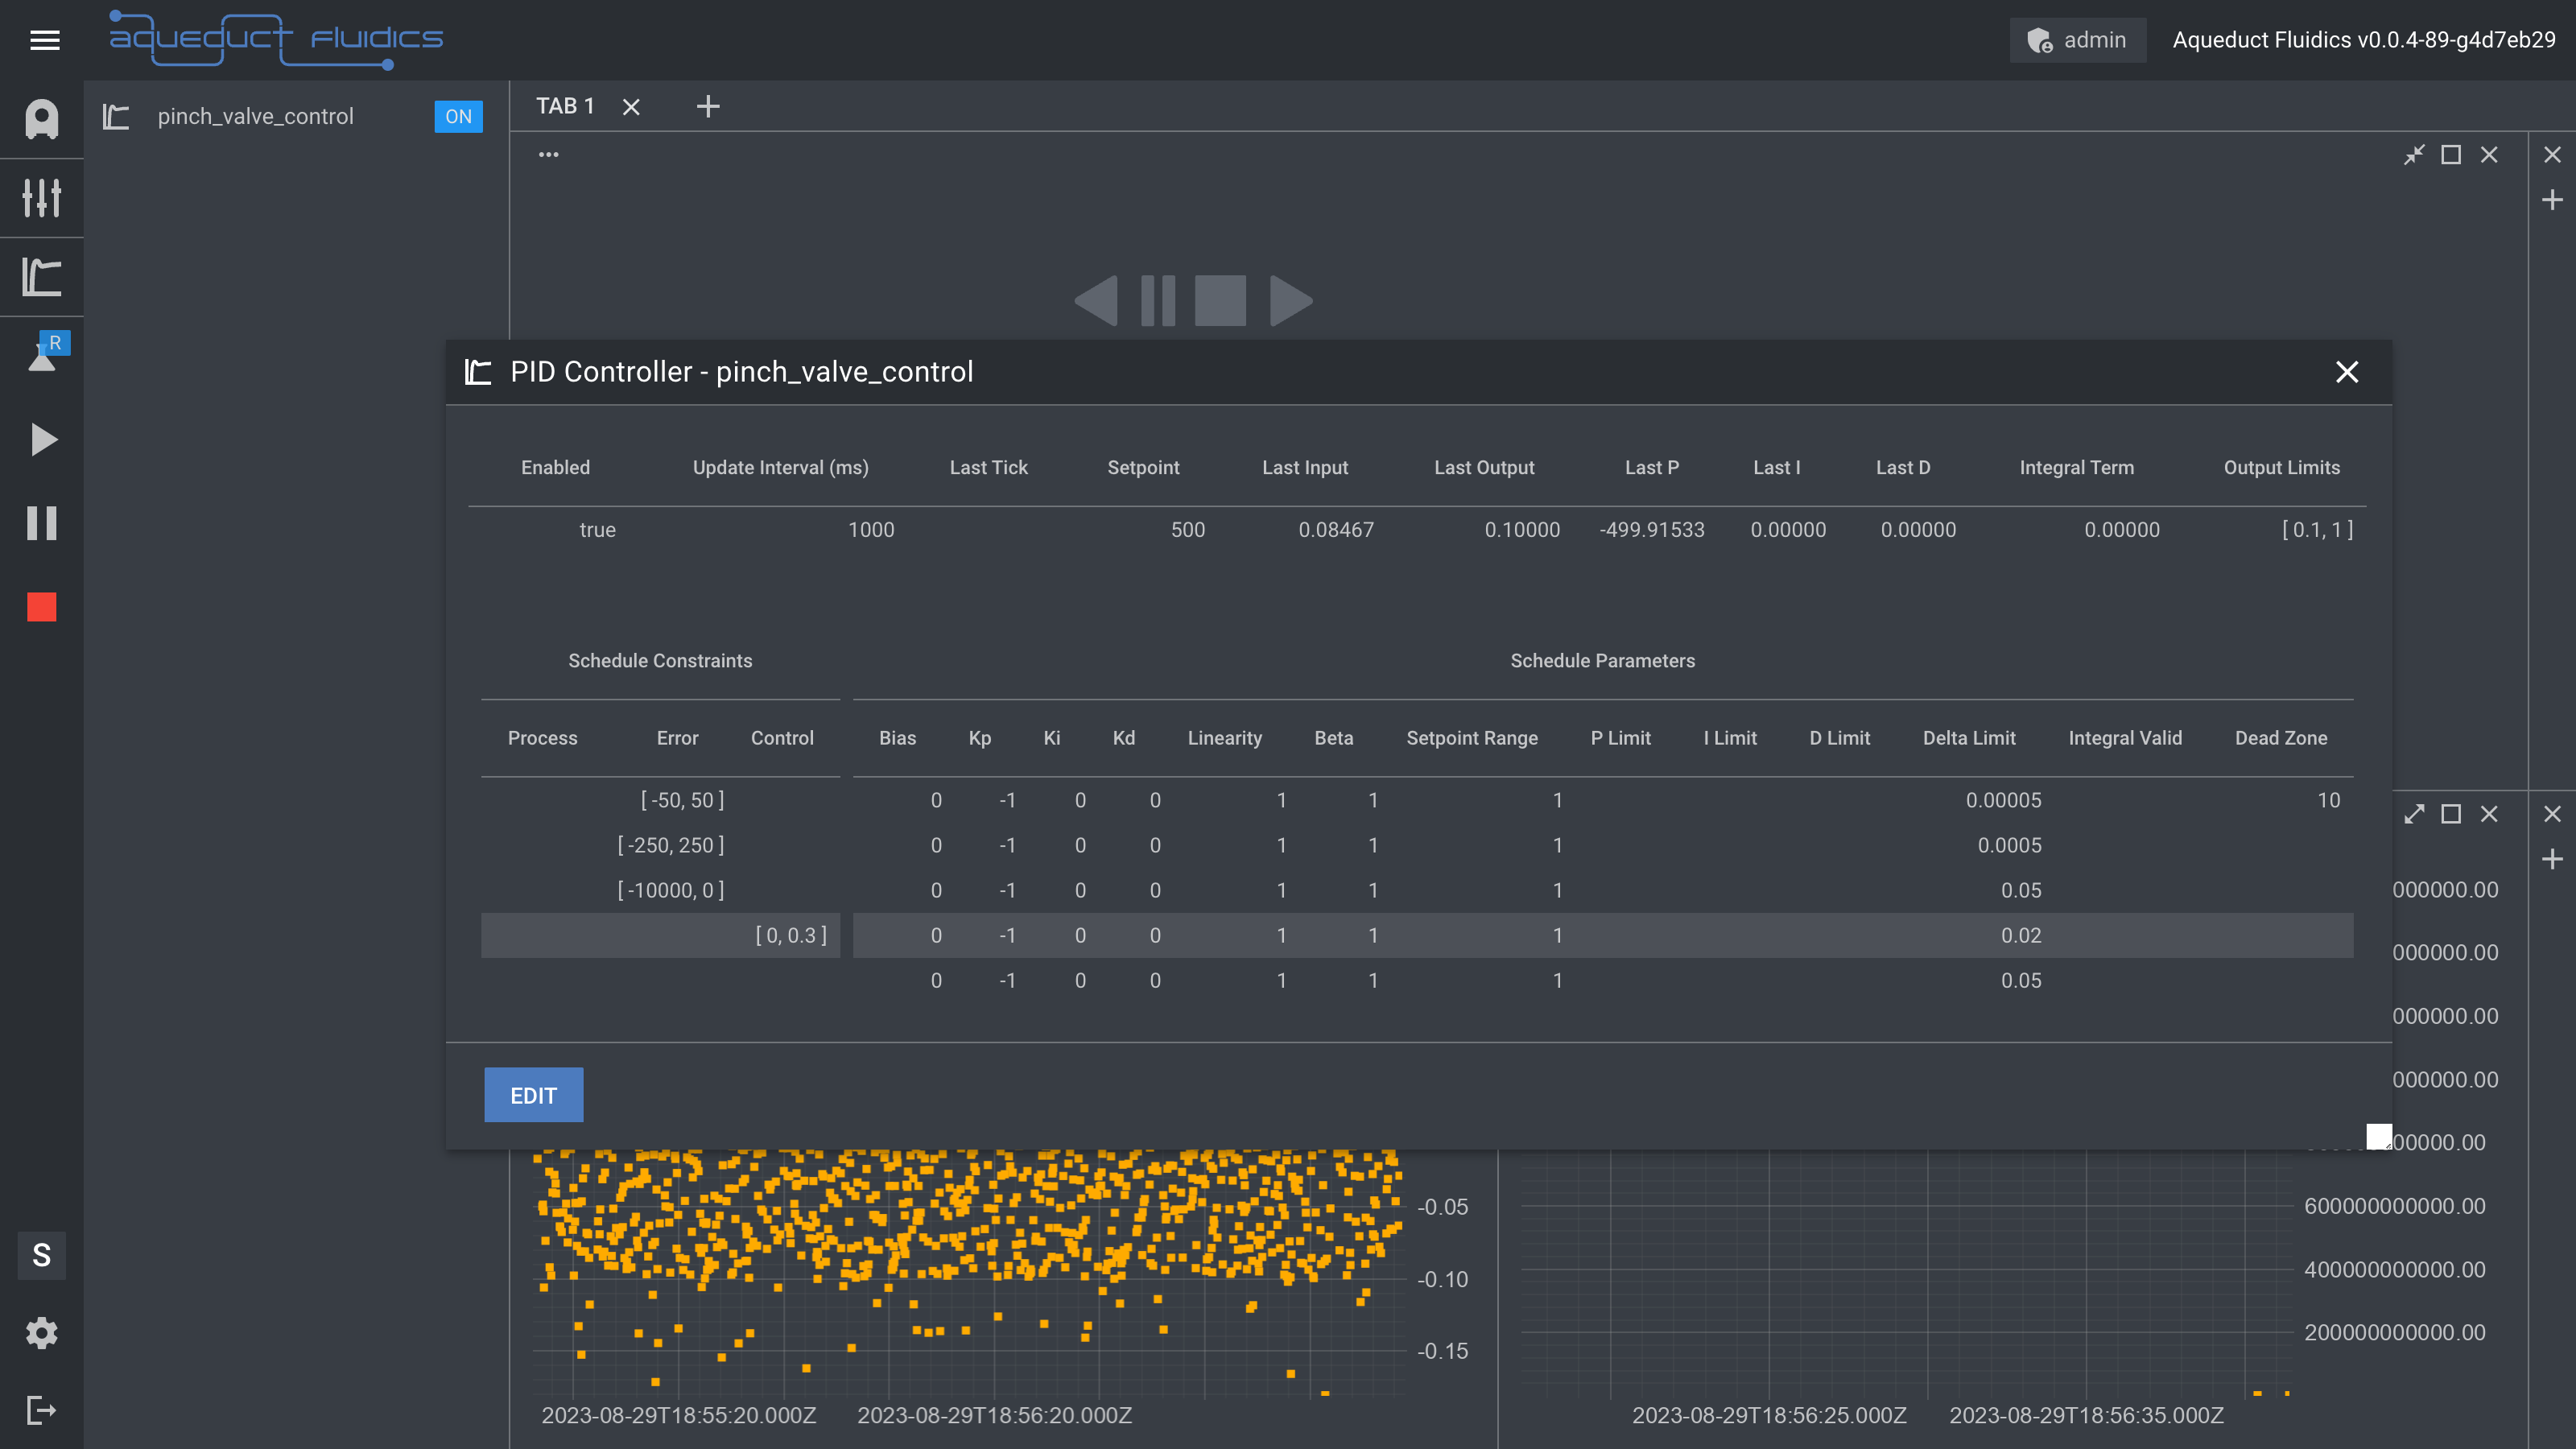
In the upper row, you'll see a table containing:
-
Enabled: This shows whether the PID Controller is currently active or not. Toggle the active state using the ON/OFF button in the controller side menu.
-
Update Interval (ms): This specifies the time interval in milliseconds at which the PID Controller updates its calculations and output. In Edit Mode, you can modify this value.
-
Setpoint: This is the target value that the PID controller is trying to achieve. In Edit Mode, you can modify this value to change the setpoint.
-
Last Tick: This represents the timestamp of the last update cycle, providing you with a sense of the timing and latency involved in the control loop.
-
Last Input: This displays the last Process Value variable that the PID Controller has read. It is updated at every "tick" defined by the update interval.
-
Last Output: This shows the last Control Output generated by the PID algorithm, giving you immediate feedback on the control action being taken.
-
Last P: This shows the contribution of the Proportional term to the last Control Output.
-
Last I: This shows the contribution of the Integral term to the last Control Output.
-
Last D: This shows the contribution of the Derivative term to the last Control Output.
-
Integral Term: This represents the integral term in the PID algorithm.
-
Output Limits: These are the minimum and maximum values that the PID Controller can output. In Edit Mode, you can modify these values to change the output limits.
In the bottom rows, you'll find a table containing more detailed information about each of the controller's schedules. Each schedule is a row divided into two main sections: Schedule Constraints and Schedule Parameters.
Note: The schedule most recently utilized for computing the Control Output is visually highlighted for quick reference.
Schedule Constraints
-
Process: Lists the acceptable bounds for the Process Variable (PV). If PV is within these bounds, the schedule is applicable with regard to this constraint. In Edit Mode, you can modify this value.
-
Error: Outlines the permissible range for the error value, i.e., the difference between the Setpoint (SP) and the Process Variable (PV). The schedule applies if the error value is within these specified limits. In Edit Mode, you can modify this value.
-
Control: Specifies the allowable Control Output (CO) range. If the CO falls within these limits, the schedule is applicable in terms of the control constraint. In Edit Mode, you can modify this value.
Schedule Parameters
-
Bias: A constant term added to the PID output to facilitate manual fine-tuning or offset compensation. In Edit Mode, you can modify this value.
-
Kp (Proportional Gain): Multiplies the error term, increasing system responsiveness to immediate errors. A higher Kp often leads to quicker error correction but may also induce oscillations. In Edit Mode, you can modify this value.
-
Ki (Integral Gain): Scales the accumulated error term. A higher Ki value accelerates correction for persistent, cumulative errors but risks integral wind-up. In Edit Mode, you can modify this value.
-
Kd (Derivative Gain): Multiplies the rate of change of the error term, effectively 'predicting' future errors. Higher Kd values can prevent overshooting the setpoint but may amplify noise. In Edit Mode, you can modify this value.
-
Linearity: Alters control output behavior in non-linear systems, often useful for dealing with systems whose response varies over its operating range. In Edit Mode, you can modify this value.
-
Beta: Adjusts setpoint weighting to improve performance in systems with notable time delay or inertia. In Edit Mode, you can modify this value.
-
Setpoint Range: Defines a 'success zone' around the setpoint, within which the system is deemed to have adequately achieved its control objective. In Edit Mode, you can modify this value.
-
P Limit: Caps the Proportional term in the PID calculation to prevent excessive control action. In Edit Mode, you can modify this value.
-
I Limit: Sets an upper limit for the Integral term to avoid integral wind-up scenarios, which could otherwise destabilize the system. In Edit Mode, you can modify this value.
-
D Limit: Constrains the Derivative term to prevent it from responding too aggressively to rapid changes or noise in the system. In Edit Mode, you can modify this value.
-
Delta Limit: Specifies the maximum allowable change in Control Output between successive control cycles, enhancing system stability by limiting abrupt control actions. In Edit Mode, you can modify this value.
-
Integral Valid: Demarcates the error range within which the integral term is active, helping to prevent integral wind-up in regions where it might not be beneficial. In Edit Mode, you can modify this value.
-
Dead Zone: Establishes an error range around the setpoint where control actions are intentionally ignored, which minimizes chattering or excessive control activity near the desired value. In Edit Mode, you can modify this value.
Entering Edit Mode
Below the main table, you'll find an "Edit" button. Once clicked, certain cells within the table will change their background color, indicating that these cells are now editable.

Making Changes
To make a change, simply click on the cell with a different background color and type the new value.
Applying Changes
After editing, click the "Update" button, located at the bottom, to apply your modifications. Click the "Reset" button to revert the values.